Visualizing Underground 3D Spaces in DwarfCorp
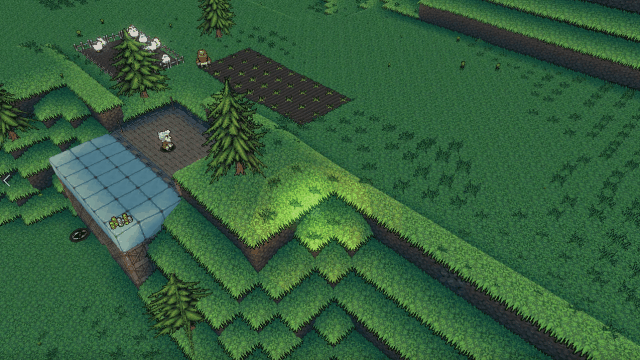
DwarfCorp is an open-source game about building a colony in vertical 3D underground spaces. The terrain is made up of 3D blocks (i.e voxels) of stone, dirt, ore, water, lava and air. You command your dwarfs to build underground chambers, hallways, vertical shafts, stairways, etc. from an overhead camera view. So in designing DwarfCorp we found it incredibly important to produce ways of easily visualizing and interacting with both above and underground 3D spaces.
The challenge is that fundamentally when the camera is above ground, stuff (terrain, and objects such as trees) gets in the way (this is called occlusion). How can we tell what the player wants to interact with? Do they want to select objects on the surface? Or do they want to see the objects below ground level? If they want to see stuff below ground level, how far down do they want to see and interact with? On the other hand, if the camera is placed below ground, it becomes too close to see the structure of the player’s base and make broader decisions about where dwarfs should mine.

We tackled this problem of camera control and interaction with a few tricks: walking around, slicing, and x-ray vision.
Walking Around
One obvious way of being able to see stuff underground is simply to allow the camera to move underground. If you were trying to mine out a mountain in real life and wanted to see what the miners were doing, the simplest way of doing so would be to walk into the mine yourself to take a look. In this mode, the player can just walk around, look at their dwarfs up close, jump up on top of ledges, and fall down into shafts. Playing the game this way feels a lot like playing Minecraft.
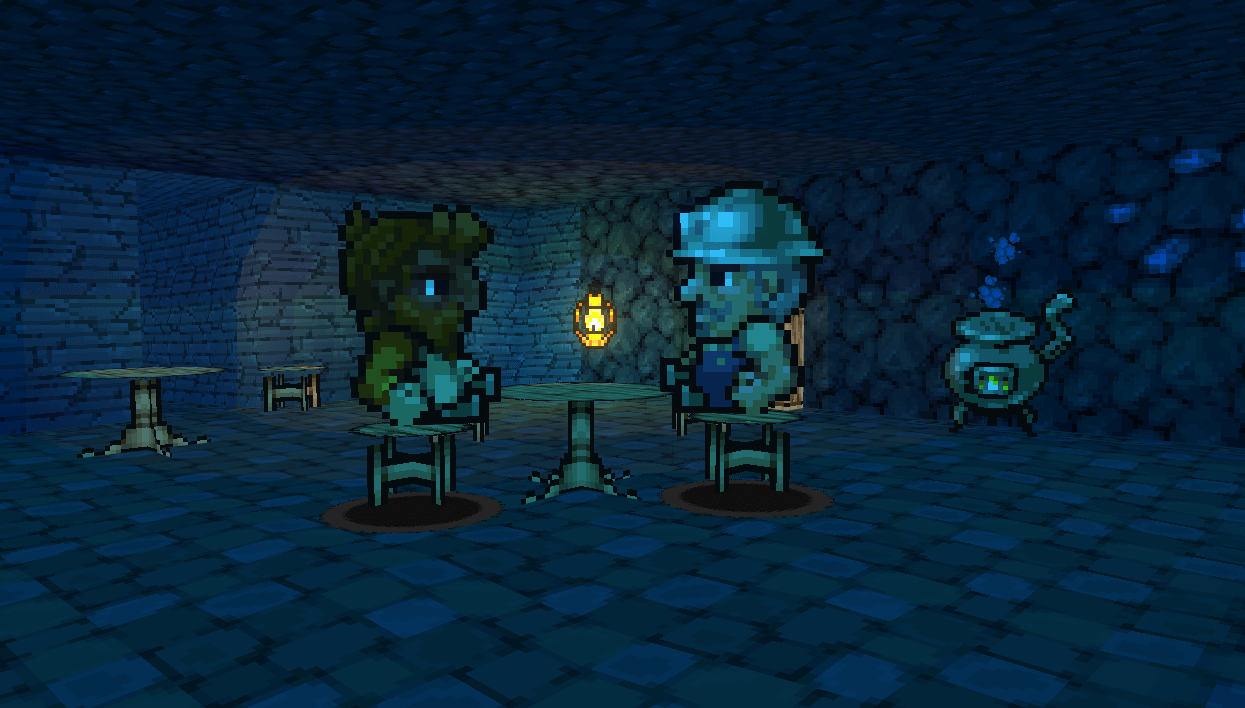
To keep continuity of control schemes, we also took care to make sure that all of the same game controls work in Walk Around mode as in any other camera mode. There is some awkwardness accompanied with using the mouse while also trying to turn the camera. So we just gave the player the ability to toggle between using the mouse and turning the camera.
However, this mode has some disadvantages. When you’re up close and personal with the dwarfs, it’s hard to get a good overview of the colony, building progress, and combat. It’s often necessary to command dwarfs to far away locations for mining, gathering resources, or fighting monsters. One of the ways you can do this is by flying around while in walk mode. If you want a good overview of your colony from above, you can simply fly out of the mines and up into the sky to take a look. Unfortunately, you still can’t see underground this way without usng one of our additional tricks.
Slicing
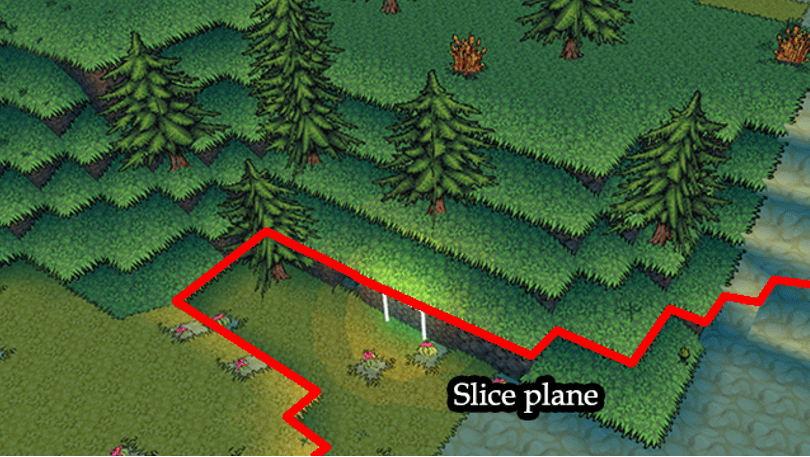
We’re not the first to make this kind of game, so of course we used some ideas from other games in the genre. The granddaddy of them all, Dwarf Fotress has much the same style of gameplay, but takes place on a 2D plane of iconographic symbols. Dwarf Fotress represents 3D action on a 2D plane by using slices. The idea is pretty simple, as you can see below:

The player is always looking at a particular slice of the terrain. The slice is just an upper bound on the height of the terrain we want to visualize. Everything below the slice is drawn in faded colors, looking like fog, everything above the slice is simply invisible. Essentially you use this to cut off the top of mountains and take a look inside, allowing you to see passageways through the mountain. Other games in the genre use a similar concept to allow you to see through terrain.
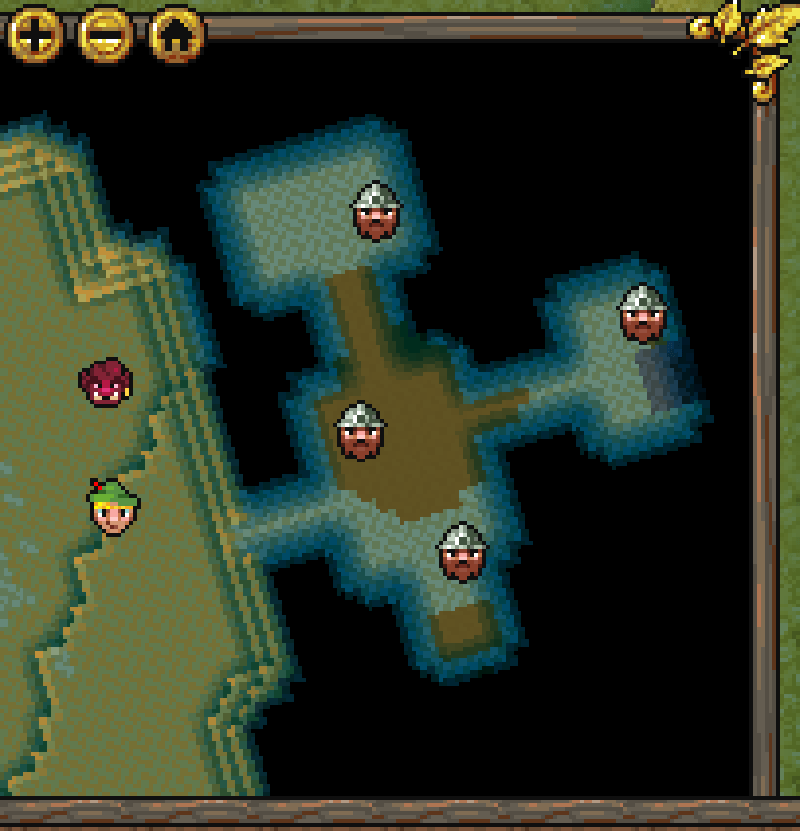
Our minimap essentially mimics this idea exactly. You can see 2D slices of terrain in the minimap. These are rendered onto a render target which pans and zooms with the camera. Objects are simply reprsented as icons on the map, and we only draw the icons if they are below the slice plane and are open to the sky above (where terrain above the slice plane is considered to be invisible). Implementing slicing in 2D is one thing. Implementing it in 3D in such a way that it both looks good and performs well is another matter. In some other fields like medicine or CAD, 3D volumetric rendering is used to represent slices of 3D data. In our case, slicing is handled by our terrain geometry builder and in the GPU in our shaders.

Slicing: Terrain Geometry Generation
We could imagine implementing slicing by simply regenerating terrain geometry every time the player changes the slice plane, considering anything above the slice plane to be air. This works, but it’s far too slow to allow the player to easily change the slice plane in real time. If you look at what actually needs to be done, no geometry except the vertices between the slice plane and the layer below actually need get regenerated. The terrain both above and below the slice is still valid, it’s just that the terrain above needs to be made invisible.

So, our terrain geometry builder keeps a cached mesh for each layer of the terrain. Most of the time a layer will just be air or completely filled with solid or unexplored voxels. In these cases no mesh needs to be stored at all. In the cases where there is actually some terrain in the layer, we store the mesh for the sides and tops of the voxels where relevant, and regenerate this cached layer whenever the terrain around it gets modified.
Then, when it’s time to slice, we simply don’t draw any of the meshes above the slice plane, and do draw the meshes below it. We also append the missing top faces for the slice layer which would have been occluded by the voxels above which are now visible.

In practice, to keep things fast we copy all of the vertex data into a static buffer which then gets drawn. This is much faster than the terrain generation process, and so it’s pretty fast — but we do have higher memory usage than if we regenerated all the terrain data at the same time.
Slicing: Shader
To keep things looking nice and to deal with non-terrain geometry, we also apply a pixel shader that fades objects above the slice plane to transparency. This allows the player to see ghosted out objects just above the slice plane, and by animating the shader we can gradually make objects above the slice plane appear and disappear so that the player has a better idea of what’s happening.

// Plane defined by worldspace normal and distance from origin.
SlicePlane = vec4(N.x, N.y, N.z, d);
clip_vector = dot(world_pos, SlicePlane);
alpha = clamp(-0.25 / (clip_vector.w * 0.75), 0, 1);
Object Silhouettes
Before we talk about terrain X-rays let’s briefly mention object silhouettes Players can see their dwarfs behind occlusions and underground through a blue silhouette. To accomplish this effect, we simply render the dwarfs twice. In the first pass, we render the dwarfs in a solid blue color while neither reading nor writing to the depth buffer. In the second pass, we render the dwarfs as normal while both reading from and writing to the depth buffer.

The effect is that anything drawn before the dwarf was drawn and which occludes it will have a blue silhouette of the dwarf overlaid on it. The second pass overdraws only the pixels that aren’t already occluded by terrain.
X-Ray View
Slicing is one way of visualizing 3D underground spaces, but it loses something in the process: to view the full 3D structure of the scene you have to keep slicing up and down, so you can’t see the entire structure at once. Local context in the up-down direction is lost. It’s also annoying to try to find the right slice. Often, all the player wants to do is understand at a broad level what’s happening underground, and they want to do this rapidly.
To accomodate this style of play, we also support a camera mode called “x-ray”. In x-ray mode you can see both the structures above ground and the chambers underground overlaid on top of each other by varying the transparency of surfaces in screen space. This can actually be done entirely in a pixel shader.
Above vs. Under Ground
To determine how to draw the terrain, we first have to decide what parts of it are above ground and which parts are underground. This is a somewhat tricky question: is a space underneath an overhang but otherwise open to the air “underground?” is a space inside a fully enclosed building “underground?” how about the bottom of a shaft that is exposed to the sky?
We considered solving this problem in two ways — first, we could flood-fill the entire world starting from the sky, marking anything that the flood fill touches as “above ground”. But this is too slow, and has negative unintended consequences. For example, it makes caves which have an opening to the surface (by extension any mine that dwarfs dig) “above ground”. So that’s not the right way to do it.
Instead, we do the following:
- Mark the whole world as underground.
- For each air voxel at the top of the world iterate from that air voxel downward.
- Mark any air voxel we encounter as “above ground”.
- If we encounter something that isn’t air, break.


This simulates sunlight streaming down from directly above. Incidentally this is exactly how we calculate sunlight, so we just use the same value for “above-groundness”.
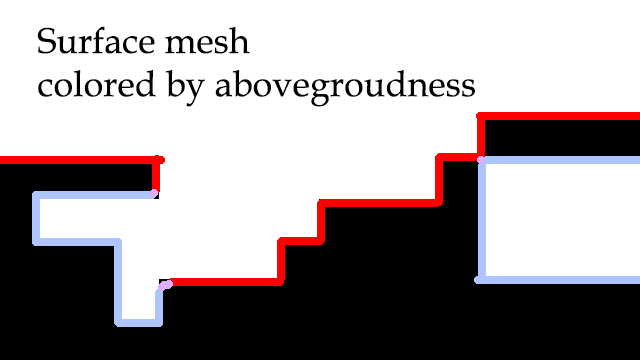
When it comes time to actually generate vertices for the terrain mesh, we use trilinear interpolation of the surrounding voxels to determine just how “underground” that vertex is. This is then stored as a single channel in a vertex attribute for the mesh.
X-Ray Shader
Now comes the magic. Once we have the terrain divided into two labeled meshes: one for above ground and one for underground, we can vary the alpha of the above ground mesh to create a “window” in which we can see the underground terrain through the above ground terrain. We also apply some effects to the above ground terrain to desaturate it so that the below ground terrain stands out more. Note that in DwarfCorp, we use stipple alpha for this effect rather than blended alpha so that we don’t have to sort the terrain triangles before applying it.
- For each pixel
- Find the “undergroundness” of the pixel.
- Set the saturation of the pixel to its undergroundness.
- Find the distance of the pixel to the center of the screen.
- Set the alpha of the pixel proportional to both the “undergroundness” and the screen radius minus the distance to the center.
- That is: alpha = lerp(1.0, (screen_radius – pixel_dist) / screen_radius, 1.0 – above_groundness);

Conclusion
We’ve demonstrated some of the ways that we visualize underground 3D spaces in DwarfCorp a first-person view, silhouettes, slicing, and x-ray views. But there’s still much that could be done. For example, it might be useful to have horizontal as well as vertical slices, and there’s probably a lot of work that could be done on the X-ray shader to make underground spaces stand out more.
Great work! Please keep up!